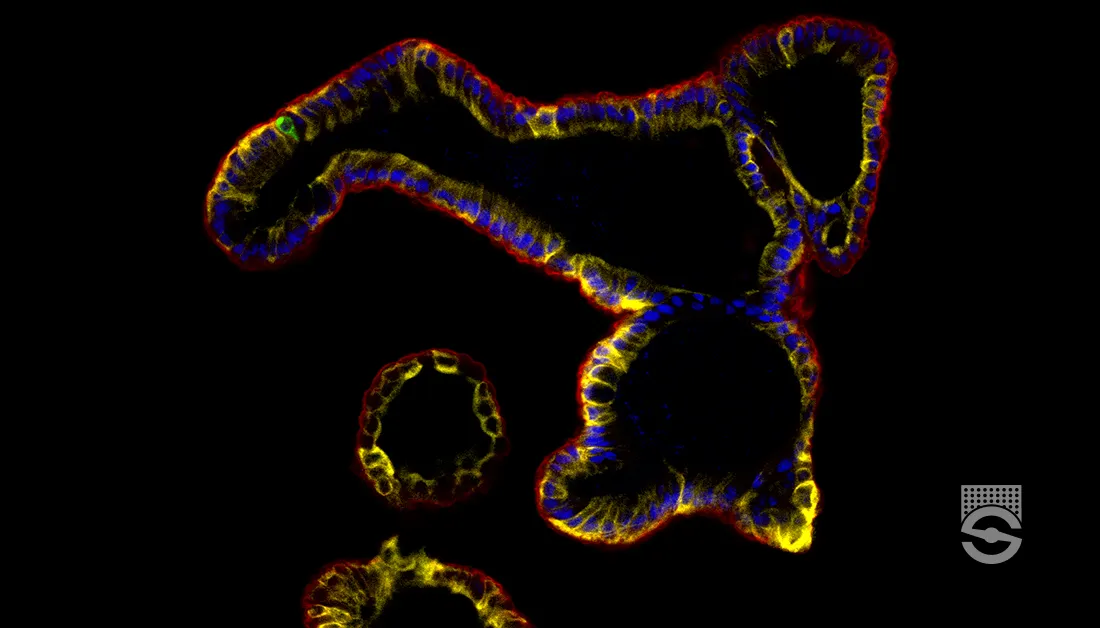
Cryogenic Tissue Processing of Neural Organoids
This protocol is for processing mature neural organoids for cryosectioning, with the recommended fixative being paraformaldehyde. Aldehyde-based fixatives (e.g. formaldehyde, glutaraldehyde) are advantageous for preserving secondary and tertiary protein structure, although overfixation can mask epitopes. Dehydration-based fixatives (e.g. methanol, ethanol) may be useful for exposing hidden epitopes, but can also destroy other epitopes. Because sample preparation has a large bearing on the quality of downstream staining in any immunostaining protocol, some antibodies may perform better with dehydration-based tissue fixatives.
After cryosectioning, perform immunofluorescence staining of cryosectioned neural organoids:
View Immunostaining Cryosections of Neural Organoids Protocol >
Materials
- 50 mL conical tubes
- Dulbecco’s phosphate-buffered saline without calcium and magnesium (D-PBS)
- 4% Paraformaldehyde (PFA) solution
- PBS-T, mixed thoroughly and can be stored at room temperature (15 – 25°C)
Material Amount Tween® 20 (Sigma-Aldrich Catalog #P9416-100ML) 1 mL D-PBS 1 L - 30% sucrose solution, mixed thoroughly and can be stored at 2 – 8°C
Material Amount Sucrose 200 g D-PBS 1 L - Water bath (37°C)
- Gelatin solution, prepared fresh, mixed thoroughly, and used immediately
Material Amount Sucrose 10 g D-PBS 100 mL Gelatin from Porcine Skin 7.5 g - Dry ice
- 100% ethanol
- Embedding mold
- Cryostat
- Microscope slides and coverslips
Tissue Sample
Fixation
- Cut the end off a 1 mL (p1000) pipette tip. Using the cut pipette tip, transfer cultured neural organoids to a fresh 50 mL conical tube. As many organoids as desired may be transferred to a single tube, as long as they are all completely submerged in all subsequent steps.To preserve cytoarchitecture, it is important not to disturb organoids during transfer. Pipette tips can be cut to a larger diameter as needed to accommodate organoid size.
- Remove excess medium from the tube. Wash 3X for 10 minutes each with D-PBS. Remove D-PBS.
- Add 5 mL fresh 4% PFA per organoid. Incubate overnight (i.e. 16 hours) at 2 – 8°C.Detection of cytoarchitecture in neural organoids via immunofluorescence requires proper and thorough fixation of samples. Therefore, using freshly prepared 4% PFA solution from frozen stock aliquots is recommended.
- Remove PFA from the conical tube and dispose of it according to appropriate waste handling procedures. Wash organoids 3X for 10 minutes each with PBS-T.
- Store samples in PBS-T at 2 – 8°C for up to 1 week.
Protocol
Cryoprotection
- Remove PBS-T from organoids and discard. Add 5 mL 30% sucrose solution per organoid.
- Allow samples to equilibrate in 30% sucrose solution overnight at 2 – 8°C.Time to equilibrate can vary due to organoid size and density. Once organoids no longer float in the 30% sucrose solution, it is appropriate to move to the next step.
Embedding
Gelatin is preferable for neural organoids over other embedding reagents such as optimal cutting temperature compound (OCT), as it provides better rigidity and supports the generation of smooth, clean sections. Gelatin will begin to polymerize and harden at room temperature, so it is necessary to quickly transfer organoids to the embedding mold.
A thin layer of gelatin embedding solution may first be added to the mold and allowed to solidify prior to adding the organoid. This will allow the organoid to be positioned more easily toward the center of the block. Once the organoid has been placed in the mold and the embedding solution has been topped up, use a pipette tip to reposition the organoid if needed.
- Warm gelatin solution to 37°C in a water bath.
- Pipette sucrose solution out of conical tube and discard. Add enough gelatin solution to completely cover organoids.Multiple organoids may be embedded in a single block if desired. On the other hand, older or larger organoids may have necrotic centers, which means they can shear more easily during sectioning. These samples can benefit from being embedded in larger gelatin blocks to provide more external support.
- Incubate at 37°C for 1 hour. This allows the gelatin to penetrate and encapsulate the organoid.For older or larger organoids, additional incubation time with liquid gelatin at 37°C before embedding can also help by allowing the gelatin to better penetrate the tissue and provide support.
- Remove organoids from conical tube and transfer to embedding mold.
Snap Freezing
Rapid freezing helps to prevent the formation of ice crystals in the organoids and to maintain the native cellular architecture of the sample.
- Prepare a dry ice/ethanol slurry by adding dry ice to 100% ethanol.
- Once the mixture stops boiling, add the embedded sample by holding the embedding mold with forceps and submerging it into the slurry.
- Keep the sample in the cold slurry until completely frozen, then transfer to a -80°C freezer for long-term storage.If freezing artifacts are still present in samples, snap freezing can also be done via immersion into an isopentane bath chilled with liquid nitrogen. Alternatively, samples may be placed directly into liquid nitrogen in an appropriate vessel such as a dewar flask.
Cryosectioning
- Remove blocks from the -80°C freezer and allow them to warm to sectioning temperature in the cryostat for 30 minutes.
- Optimal sectioning temperature for gelatin-embedded organoids is -26 to -30°C.
- Typical sectioning thickness is 10 – 20 μm, and can be adjusted based on the imaging to be performed.
- Collection of multiple serial sections can allow exploration of different markers in different sections.
- If sections are curling, use a thin brush that has been cooled and kept in the cryostat chamber to gently flatten the section before mounting it on the slide.
- Always use a new, sharp blade for sectioning.
Safety Note
Prior to handling any chemical, consult the Safety Data Sheet (SDS) for proper handling and safety precautions.
References
- STEMCELL.com (Accessed 2024)
Cryogenic Tissue Processing and Section Immunofluorescence of Neural Organoids