What Is Immunostaining Used For?
Immunostaining is a method of detecting a protein or target antigen in a sample by specifically labeling the target with an antibody that can then be visualized. Immunostaining forms the basis of immunocytochemistry, immunohistochemistry, and immunofluorescence protocols.
History of Immunofluorescence
The immunostaining-immunofluorescence approach was first used as early as 1941, when Albert Hewett Coons et al. constructed a fluorescein-isocyanate compound to visualize pneumococcal antigens in infected tissue. In 1964, Beutner and Jordon used indirect immunofluorescence for the first time to detect antibodies in individuals affected by pemphigus vulgaris.
What Is Meant by Immunofluorescence?
Immunofluorescence allows us to detect our target antigen by using an antibody that (1) has a high affinity to that antigen for immunostaining, and (2) is conjugated to fluorophores/fluorochromes. The presence of the fluorophore enables us to visualize the antibody-antigen complex using an appropriate microscope. Immunofluorescence is a fundamental technique in biomedical research, clinical diagnostics, and pathology, that sheds light (literally!) onto the players involved in the cellular mechanisms underlying physiology, pathophysiology, and the effects of drugs and other exogenous factors.
What Is the Difference Between Immunofluorescence and Immunohistochemistry?
“Immuno” refers to the reliance on antibody-antigen binding to detect the target antigen.
“Fluorescence” refers to the property of a molecule—in this case, the fluorophore tagged to the antibody—to absorb light at a shorter wavelength and emit it at a longer wavelength. This emission is detected by the detectors in a microscope, making the target visible, thus allowing us to localize it.
Fluorescence Microscopy
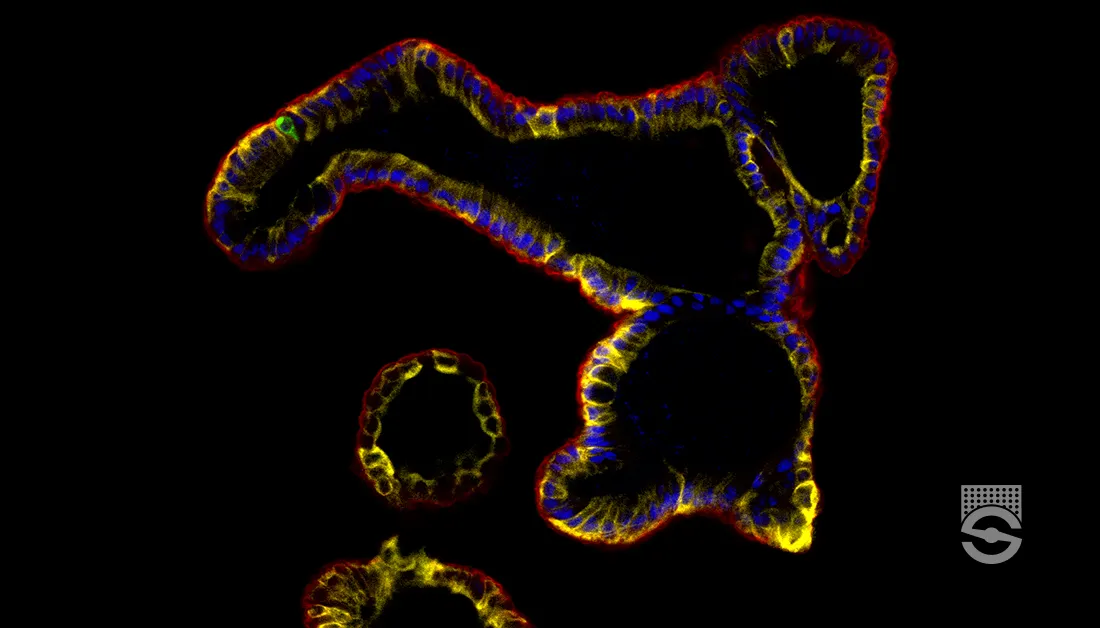
Following the observations of fluorescence in the 19th century, Carl Zeiss and Carl Reichert developed the first fluorescence microscope by 1913. By 1929, Philipp Ellinger and August Hirt used incident light instead of transmitted light, thus devising a fluorescence microscope for viewing living organisms. Their design has been further improved upon and we now have a number of different microscopy techniques, such as confocal and multiphoton microscopy, which enable high-resolution three-dimensional visualization of fluorescently labeled samples. These samples can be in vitro cells, tissues, organoids, wholemount organs or organisms, and in vivo organisms.
“Histo” means tissue. “Histochemistry” refers to the science of understanding the chemical constitution of cells and tissues.
Thus, the term “immunofluorescence” is used more broadly to refer to visualizing your target antigen in a given specimen using fluorescence. “Immunohistochemistry” refers to visualizing your target antigen on a tissue specimen typically using stains, dyes, or enzymatic reactions. Finally, “immunocytochemistry” is similar to immunohistochemistry, except that “cyto” means cells, so it is typically limited to in vitro specimens.
Chemiluminescence
Chemiluminescence is the emission of light during a reaction. In immunohistochemistry, instead of having the antibody conjugated to a fluorophore, we can conjugate the antibody to an enzyme that catalyzes its substrate in a color-producing reaction. Thus, once the antibody binds to the target, the target can be visualized with chemiluminescence rather than fluorescence by using enzymes like horseradish peroxidase (HRP).
What Are the Two Types of Immunofluorescence?
In direct immunofluorescence, the antibody that binds to the antigen (primary antibody) is also conjugated to the fluorophore.
In indirect immunofluorescence, a fluorophore-tagged secondary antibody binds to the primary antibody. Mixing and matching different fluorophore-conjugated secondary antibodies with an array of primary antibodies leads to more flexibility for target detection.
Variations of Immunofluorescence
Multiplexed Immunofluorescence
To date, numerous primary and secondary antibodies have been created and tested for different target antigens, and we can use these antibodies together for multiplexed immunofluorescence—i.e. for the detection of multiple targets, each labeled with a different fluorophore—in cells, tissues, organoids, and in vivo.
Immunofluorescence with Genetically Encoded Proteins
The cloning of the green fluorescent protein (GFP) and its expression in E. coli and C. elegans in the 1990s—and subsequent engineering of similar protein constructs—introduced a different way to detect proteins of interest. While these fluorescent proteins tend to have high levels of expression in vivo that can be used for endogenous labeling, their fluorescence may be quenched following fixation. In these cases, immunostaining for the genetically encoded fluorescent protein after fixation can ensure strong fluorescent signal from the target antigen during imaging.
Choosing an Immunofluorescence Protocol
We select and optimize the specific immunofluorescence protocol for a given antigen and sample type based on the immunostaining and imaging requirements.
Each immunostaining step has specific considerations, as listed in the overview. A good starting point for developing a protocol is from published work and supplier-provided product information sheets for the antibody or construct being used. Next, we implement this initial protocol with negative and positive control conditions and the experimental conditions. If the antibody has not been used before, trying a range of antibody dilutions is recommended.
We get confidence in our protocol when we observe a good signal-to-noise ratio for our target during imaging. If there is not enough signal, we can turn to our controls to narrow down whether there is too much autofluorescence or background staining, the primary antibody is not highly specific to our target, or another reason altogether. Troubleshooting and rerunning our experiment, as well as increasing sample size, will help us ensure the protocol’s validity.
In addition to the considerations for each immunostaining step, here are the key considerations for immunofluorescence imaging:
- Lab infrastructure, including instrumentation
- Number or format of samples
- Number of antigens to be imaged
- Total area of biological sample to be imaged, which also affects data storage
- Imaging resolution, from subcellular to cellular
- Sample preservation method
- Tissue autofluorescence
- Acquisition time
- Acquisition volume
- Data analysis, including data management, image processing pipelines, and advanced analysis
- Technical support
Overview of Immunostaining
Immunostaining involves the following main steps:
Fixation
The ideal fixation method in immunofluorescence immobilizes target antigens while maintaining cellular integrity, and allows the antibodies to sufficiently penetrate the sample and reach their targets. Since certain fixatives can degrade or mask certain epitopes, we need to empirically determine the optimal chemical fixative and fixation protocol for a given antigen and sample type. Most immunofluorescence protocols use paraformaldehyde (PFA) and/or methanol.
Embed, Section, Remove Embedding Medium, and Rehydrate (for Tissues)
For tissue samples, we embed the specimen for sectioning, typically in paraffin wax. Once sectioning has been performed and the sections mounted onto glass slides, we have to remove the embedding medium and rehydrate the specimen for subsequent steps. For deparaffinization, xylene is most commonly used. Next, we wash and rehydrate the tissue with ethanol and distilled water.
Antigen Retrieval (Optional)
Antigen retrieval may be required during immunostaining, such as staining the keratin 18 antigen. This step is usually recommended for samples fixed in PFA or other cross-linking agents since these fixatives can mask epitopes and reduce antigen-antibody binding. We do not perform antigen retrieval for samples fixed in methanol or other organic solvents.
Cell Permeabilization (Optional)
Cell permeabilization may be needed when the target antigen is expressed intracellularly, and is not needed when the antigen is presented on the cell surface. Permeabilization is usually performed with detergents, often Triton and Tween-20.
Blocking and Washing
Blocking is a necessary step for preventing antibodies from binding to non-target epitopes. We use a blocking reagent that has little affinity for the target, binds to non-target reactive sites, and stabilizes cellular morphology. The blocking reagents, blocking duration, and antibody types must also be empirically determined for a given antigen and sample type.
Most blocking buffers fall into one of the following categories:
- Protein blocking solutions, e.g. bovine serum albumin (BSA), non-fat dry milk, and gelatin, are concentrated protein buffers that indiscriminately bind to the proteins present in a sample. Our applied antibodies compete with the blocking protein for target epitopes, thus reducing non-specific binding.
- Normal serum contains antibodies from the same species as that of the secondary antibody in indirect immunofluorescence, so it blocks secondary antibodies from binding non-target epitopes. Note: we add fresh serum each time.
- Protein-free commercial blocking buffers work by eliminating non-specific binding sites. They are compatible with a wide range of antibodies, and they have a longer shelf life.
The incubation period with the permeabilization/blocking solution can range from 1 – 72 hours depending on the tissue, antigen, and antibody, though longer incubation times generally have a minimal effect on background signal.
Depending on the fixative, particularly if it is PFA, we can also wash our sample to reduce background signal. For example, we can wash epithelial organoids fixed in PFA with 0.3 M glycine for 30 minutes before blocking. Glycine binds to unreacted aldehyde groups, thus quenching PFA autofluorescence and preventing free aldehydes from reacting with antibodies.
Antibody Staining
The antibody staining step is where we expose the sample to the appropriate antibodies, usually by diluting the antibodies at an appropriate ratio in the blocking solution. Our antigen of interest can be detected using a variety of antibodies, depending on our sample type, fixation method, downstream applications, and other factors such as the cellular location of the target.
For indirect immunofluorescence, we incubate our sample in the primary antibody, wash the sample, then incubate in the secondary antibody. For a given antigen, we select a primary and a secondary antibody that are both raised against the same isotype (i.e. immunoglobulin class). This allows the secondary antibody to bind to the primary antibody. During immunostaining, we apply lower dilutions of primary antibodies (typically 1:100 – 1:800) compared to secondary antibodies (1:500 – 1:2000) to our sample. For example, you can detect beta-tubulin in a sectioned tissue sample using a mouse monoclonal antibody against beta tubulin III at 1:500, followed by a 1:1000 dilution of donkey anti-mouse IgG conjugated to a fluorophore (e.g. 488 for visualization in the green channel).
Antibody information sheets include a recommended dilution for a specific application, and this dilution varies significantly depending on whether you are immunostaining cultured cells, sectioned tissues, organoids, or wholemounts. As mentioned previously, when using an antibody for the first time or for a new application, trying a range of dilutions is recommended before selecting the optimal dilution, i.e. the highest dilution at which we have the best signal-to-noise ratio.
To figure out how much non-specific binding is visible by imaging, our immunostaining protocol should include a sample that is exposed to the fluorophore-conjugated (secondary) antibody but not the primary antibody. In some cases, such as for organoid immunostaining, we can also include an isotype control; this means the control sample is exposed to primary antibodies that lack target specificity but are the same class and type of primary antibody as our target. Having these controls is especially useful if the antigen is rare or the antibody is new, as it makes troubleshooting more efficient.
For multiplex fluorescence, since we use different fluorophores for each antigen, we must ensure that the emission spectra of these fluorophores do not extensively overlap with one another or with any counterstains or with endogenous fluorescent proteins. If there is minimal overlap between the fluorescence emission spectra of all of our targets, we can be more confident in the signal we get for a given antigen. We can find the excitation and emission spectra of our fluorophores in the product information sheets for secondary antibodies and counterstains, or from the supplier for endogenously expressed fluorescent proteins.
Counterstaining
To detect nuclei in your sample, following incubation in the secondary antibody, we typically counterstain with a nuclear marker like DAPI. We can either wash out the secondary antibody first, or add the nuclear marker into the secondary antibody solution. We incubate the sample in a relatively low concentration of the counterstain for a small amount of time, then wash the sample; the concentration and time is specified by the counterstain for a given sample type.
Clearing (Optional)
Optical clearing is particularly recommended for organoids and wholemounts, because it increases the overall signal-to-noise ratio by reducing light scatter, as well as protects fluorophores and dyes from quenching. Clearing removes, replaces, and modifies some of the sample’s components, thus homogenizing the refractive index (RI) of our sample and making it transparent.
There are many different clearing methods available, and the one you select will depend on the speed, cost, complexity, conservation of protein-based fluorescence, and compatibility with immunostaining. Additionally, different methods are more effective for smaller samples (less than a millimeter in thickness), such as slices of tissue, organoids, or insects, versus larger samples like whole organs or organisms. The most common clearing methods include the following:
- Organic solvents dehydrate samples and extract lipids to homogenize the sample to a high RI. They are used in one of the most popular clearing methods, iDISCO and its variants, which need to be performed before immunostaining. However, since they extract lipids, they cannot be used for lipid targets. Additionally, organic solvents are toxic and corrosive, requiring special precautions for their safe use and disposal.
- High RI aqueous solutions are simple to use and preserve lipids in the sample. They are useful for small but not larger samples.
- Hyperhydrating solutions remove lipids using detergents, a high concentration of urea, and a final solution with a high RI. They are simple to use and give good clearing performance while preserving fluorescence, but their speed makes them suitable for small samples only.
- Hydrogel cross-links to proteins. In hydrogel embedding, we stabilize proteins with hydrogel, extract lipids with detergents, and immerse the samples in a high RI solution. Another popular clearing method, CLARITY (and its variants), fall under this category. Hydrogel embedding leads to excellent clearing while usually maintaining endogenously expressed fluorophores, but the steps needed to ensure fast clearing are more complex than solution changes and require specific equipment.
Mounting
Before viewing our samples under the microscope, we mount them in media that buffers our sample and fluorophores, prevents photobleaching, and has a high refractive index that roughly matches that of proteins (~1.35 – 1.6). After washing our sample and aspirating the washing solution, we apply a sufficient amount of appropriate mounting media, either prepared in the lab or purchased in a ready-to-use format. Mounting media/mountants tend to be viscous, so we pipette and dispense them slowly onto the sample to prevent damage to our sample and to avoid bubbles that could later interfere with imaging.
Once the mounting media is applied, we place a coverslip over the sample. Depending on the thickness of the sample, a chamber slide or imaging spacers can be used on the slide; this allows us to submerge the entire sample in sufficient mountant without introducing deformities. Finally, we can use clear nail polish as a sealant for the coverslip, but this is an optional step.
And now, you’re ready to image!
Fluorescent Live Cell Imaging
To investigate cellular and subcellular processes, we can fluorescently label and visualize cells (or their components) of interest. Fluorescent molecules—dyes, probes, indicators, sensors, and natively expressed fluorochromes—that label the target are excited by an external light source then detected by a fluorescent microscope. By observing changes in fluorescence in the intact cell in real time, we can infer a lot about the dynamic cellular processes occurring in the microscopic world around us.
Protocols
Fluorescent Staining Protocols
Find step-by-step instructions for immunostaining and immunofluorescence of your cells, organoids, and tissues.
References
- Ariel, P. (2017)
A beginner’s guide to tissue clearing.
Int J Biochem Cell Biol 84: 35–39. - Arthur, G. (2017)
Albert Coons: harnessing the power of the antibody.
The Lancet 4: 181–182. - Beutner, EH., and Jordon, RE. (1964)
Demonstration of skin antibodies in sera of pemphigus vulgaris patients by indirect immunofluorescent staining.
Proc Soc Exp Biol Med 117(2): 505–510. - Hickey, JW. et al., (2022)
Spatial mapping of protein composition and tissue organization: a primer for multiplexed antibody-based imaging.
Nat Methods 19(3): 284–295. - Im, K., Mareninov, S., Fernando Palma Diaz, M., and Yong, W.H. (2019)
An introduction to performing immunofluorescence staining.
Methods Mol Biol 1897: 299–311. - Renz, M. (2013)
Fluorescence microscopy—A historical and technical perspective.
Cytometry A 83(9): 767–779. - STEMCELL.com (Accessed 2023)
Anti-human keratin 18 antibody, clone DC-10. - STEMCELL.com (Accessed 2023)
Performing immunocytochemical staining of epithelial organoids.