Immunostaining Epithelial Cells
In Monolayers or at the Air-Liquid Interface (ALI)
This protocol describes the whole-mount immunocytochemical (ICC) staining of air-liquid interface (ALI) cultures (derived from any tissue type) or monolayer cultures (derived from primary cells, pluripotent stem cells, or cell lines) grown in Transwell® inserts. Although ICC can be performed at any point during the ALI culture differentiation phase, the highest degree of differentiated cell staining and visualization will take place after full ALI culture maturity.
The protocol has been used for human bronchial epithelial cells (HBECs) and human small airway epithelial cells (HSAECs) ALI cultures grown with PneumaCult™-ALI Medium or PneumaCult™-ALI-S Medium, which express characteristic cellular markers for the large airway (e.g. tight junctions and ciliated cells) and small airway (e.g. club cells and secretory proteins), respectively. The protocol is also verified for human intestinal cells differentiated in intestinal monolayers and ALI cultures using IntestiCult™ Organoid Differentiation Medium (Human) express higher levels of key differentiation markers (e.g. goblet cells, enterocytes, and enteroendocrine cells).
Expected Results
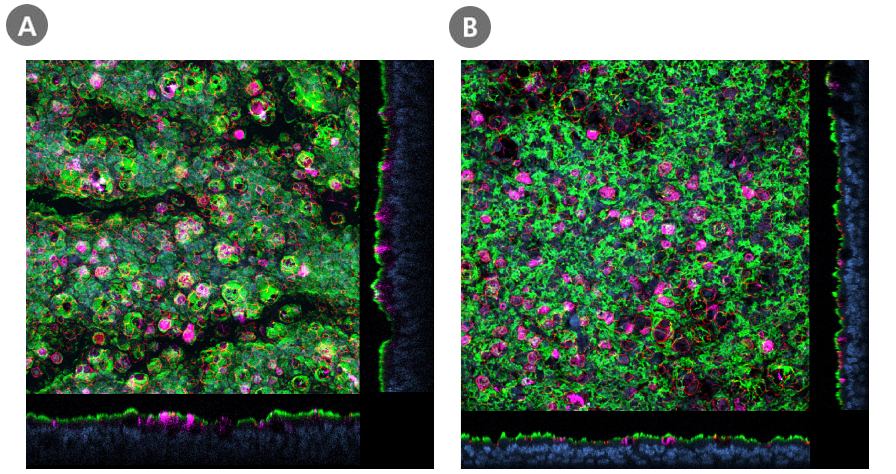
Figure 1. Immunofluorescence for AC-tubulin, ACE2, ZO-1, and DAPI in <P6 Air-Liquid Interface (ALI) Cultures of Human Bronchial and Small Airway Epithelial Cells (HBECs and HSAECs)
Air-liquid interface (ALI) cultures of human bronchial and small airway epithelial cells — HBECs cultured in PneumaCult™-ALI Medium and HSAECs cultured in PneumaCult™-ALI-S Medium, respectively — expressed markers for respiratory epithelial cells. HBECs at <P6 and HSAECs at <P4 were immunostained for AC-tubulin (for ciliated cells; in green), ACE2 (for SARS-CoV-2 receptor; in magenta), ZO-1 (for tight junctions; in red), and DAPI (for nuclei; in blue). This image was contributed by STEMCELL Technologies.
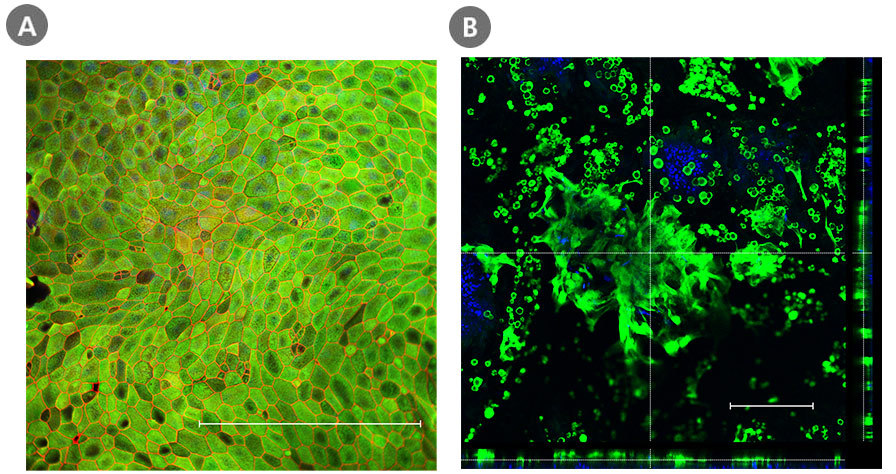
Figure 2. Immunofluorescence for KRT20 and ZO-1 in Day 7 Submerged Monolayers and MUC2 in Day 14 Air-Liquid Interface Cultures of Organoid-Derived Intestinal Cells
Organoid-derived monolayers grown as a submerged monolayer (Day 7) or at the ALI (Day 14) using IntestiCult™ Organoid Differentiation Medium (Human) expressed key differentiation markers for intestinal cells. Nuclei were counterstained with DAPI (in blue). (A) Monolayers were immunostained for KRT20 (for enterocytes; in green) and ZO-1 (for tight junctions; red). (B) Cells cultured at the ALI show an increased secretory cell differentiation, as seen by immunostaining for MUC2 (for goblet cells; in green). Scale bar: 250 µm. This image was contributed by STEMCELL Technologies.
Materials
- Phosphate-buffered saline (PBS)
- Methanol
- Parafilm®
- Kimwipes™
- Acetone
- Aspirator
- Pasteur pipette
- 100 mL blocking buffer, mixed thoroughly and stored at 2 – 8°C
Material Quantity Final concentration PBS 97.85 mL Normal serum* 2 mL 2 % BSA 1 g 1 % Cold fish skin gelatin 100 mg 0.1 % Triton™ X-100 100 μL 0.1 % TWEEN® 20 50 μL 0.05 % Sodium azide** 50 mg 0.05 % *The Normal serum must be of the same species as used to generate the secondary antibody.
** Sodium azide is an antibacterial agent added to prevent bacterial growth in the buffer when stored for longer periods. It is very toxic and is dispensable as long as the buffer is used quickly (within a few days). - Primary and secondary antibody/ies of choice
- Can be identified with the Antibody Dilution Finder
- 100 mL primary antibody dilution buffer, mixed thoroughly and stored at 2 – 8°C
Material Quantity Final concentration PBS 100 mL BSA 1 g 1 % Cold fish skin gelatin 100 mg 0.1 % Sodium azide 50 mg 0.05 % - 100 mL of secondary antibody dilution buffer, mixed thoroughly and stored at 2 – 8°C
Material Quantity PBS 100 mL Sodium azide 50 mg - 1 mL of DAPI staining stock solution, aliquoted into volumes of 50 μL
Material Quantity PBS 1 mL DAPI 5 mg - The DAPI staining stock solution will have a final concentration of 5 mg/mL.
- Store the DAPI staining stock solution at -20°C, then thaw separate aliquots for future use.
- Liquid mountant (e.g. Prolong™ Gold Antifade Mountant)
- Confocal or fluorescence microscope
- Microscope slides (e.g. SuperFrost™ Plus Microscope Slides)
- Coverslips
Tissue Sample
Plate Preparation
- Retrieve the ALI cultures growing in Transwell® inserts in a cell culture plate from the incubator.
- In a biosafety cabinet, remove the culture medium from the plate wells, and wash the ALI cultures 5X with room temperature PBS for 5 minutes each. Carefully aspirate PBS, making sure not to touch the culture.Note: If your ALI cultures are undergoing electrophysiology analysis in an Ussing chamber, retrieve them, remove any excess buffer from the Transwell® inserts, and proceed to the next step.
- Place the plate containing Transwell® inserts in ice-cold (-20°C) methanol and seal the plate with Parafilm®. Incubate the plate overnight at -20°C.
- Remove the methanol from the ALI cultures by quickly inverting each Transwell® insert, and dabbing on a Kimwipe™.
- Dip the bottom portion of the inserts, containing the polyester membrane, into -20°C cold acetone for 1 minute. After 1 minute, dab on a Kimwipe™ to remove any excess acetone, and set upside down to air-dry. Once dry, store the plate containing Transwell® inserts at 2 – 8°C until needed, or proceed to the next step (blocking).
Protocol
Blocking
- Gently wipe the bottom of each Transwell® insert with a PBS-soaked Kimwipe™.
- Wash each insert 3X with PBS for 5 minutes each, adding 200 μL PBS to the apical compartment and 500 μL PBS to the basal compartment. After each wash, use an aspirator to carefully remove the PBS.
- Incubate the inserts with the blocking buffer at room temperature for 1 hour. Rocking the plates is not necessary, but beneficial when possible.
Primary Antibody Addition
- Wash each insert 3X with PBS for 5 minutes each.
- Add primary antibodies of your choice to the primary antibody buffer at the desired dilution. Add 200 μL of this diluted mixture to the apical compartment and 500 μL to the basal compartment.
- Incubate overnight at 2 – 8°C. Rocking the plates is not necessary, but beneficial when possible.
Secondary Antibody Addition
- Remove the primary antibody buffer from each insert by aspiration, and then wash them again 3X with PBS, for 5 minutes each.
- Add relevant secondary antibodies into the secondary antibody buffer at a dilution of 1:1000. Add 200 μL of this diluted mixture to the apical compartment and 500 μL to the basal compartment.
- Incubate the inserts at room temperature for 2 hours in the dark. After adding the conjugated secondary antibody, avoid exposing the plate to light to prevent any fluorescence quenching.
Mounting and Visualization
- Wash the inserts 3X with PBS, for 5 minutes each.
- Add DAPI staining stock solution into PBS at a dilution of 1:1000. Add 200 μL of this diluted mixture to the apical compartment and 500 μL to the basal compartment.
- Incubate at 2 – 8°C for 10 – 15 minutes.
- Wash each insert once with PBS for 5 minutes.
- Aspirate the PBS from the individual inserts, then peel or cut the polyester membrane from the Transwell® hanger (Figure 1). Once separated from the hanger, use surgical scissors to cut away the curved membrane edge. This will allow the stained culture membrane to sit flat under the coverslip during the mounting procedure.
- Using a plastic Pasteur pipette, add one droplet of liquid mountant to a microscope slide for every stained culture membrane to be mounted.Do not exceed three culture membranes to be mounted on a single slide.
To prevent air bubbles being caught under the coverslip from step 24, add a small volume of liquid mountant in a line to connect the existing droplets of the solution. - Using forceps, place one stained culture membrane, cell-side up, on a droplet of liquid mountant. Add extra liquid mountant on top of the membrane, so as to completely cover the membrane’s surface. Carefully place a coverslip on top of the membranes covered in liquid mountant.
- Allow the slides to cure at room temperature overnight in the dark, sitting horizontally flat.
- On the following day, visualize and take images of the stained membranes using a confocal microscope at 63X oil immersion.
Notes
Safety Note
Prior to handling any chemical, consult the Safety Data Sheet (SDS) for proper handling and safety precautions.