Immunostaining Epithelial Organoids
This protocol is for immunostaining epithelial organoids — derived from different tissue types including intestinal, mammary, prostate, lung, pancreatic, and liver derived from primary cells or pluripotent stem cells — after fixation:
View Fixing Epithelial Organoids for Immunostaining >
If multiplexing, stain only one Matrigel® dome per antibody panel. If you intend to stain with 4 different panels for example, pool organoids from 4 domes. Depending on the number of the organoids per dome, some optimization may be required. When multiplexing, ensure that the antibody combinations are from different species to avoid cross-reaction during staining.
Expected Results
Expected results depend on the targets of interest, as immunostaining must be optimized for antigens, antibodies, cell and tissue type. Best practice is to refer to the Product Information Sheet as a starting point, and to optimize conditions in-house.
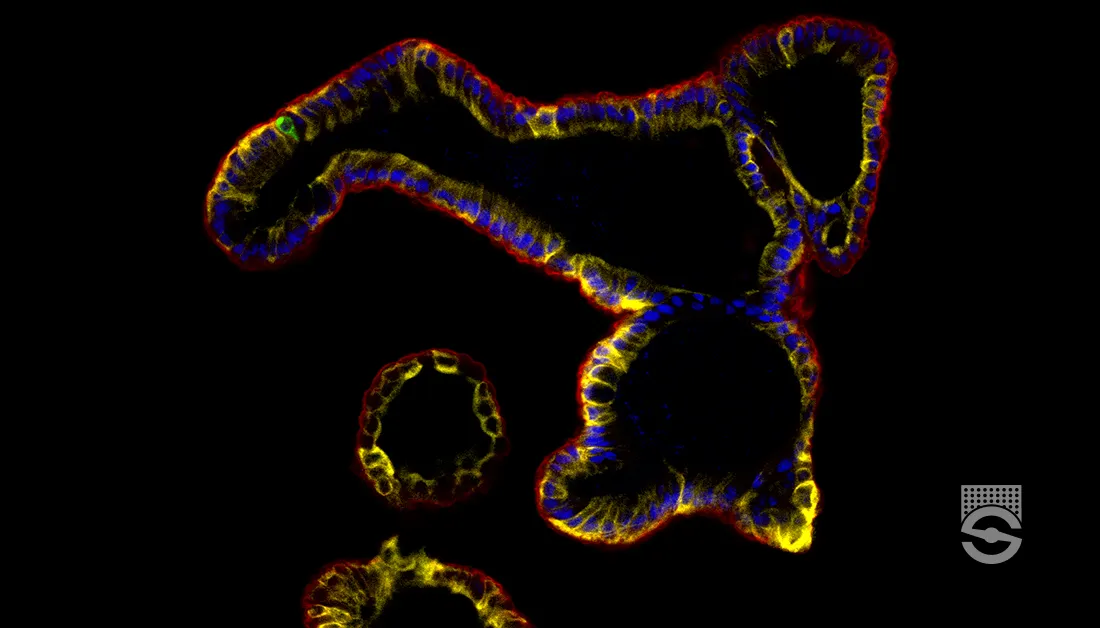
Figure 1. Immunofluorescence for Chromogranin A, E-cadherin, KRT20, and DAPI in Epithelial Organoids
Epithelial organoids grown in IntestiCult™ OGM express chromogranin A (CHGA; for enteroendocrine cells; in green), e-cadherin (ECAD; for renal epithelium cells; in red), KRT20 (for enterocytes; in yellow), and DAPI (for nuclei; in blue). This image was contributed by STEMCELL Technologies.
Materials
- Dulbecco’s phosphate-buffered saline without calcium and magnesium (D-PBS)
- Citrate buffer, stored at 2 – 8°C for up to 6 months
Material Quantity dH2O 1 L Sodium citrate dihydrate 2.94 g HCl to adjust pH 6.0 pH Tween® 20 0.5 mL - 1.7 mL-tube heating block
- Permeabilization solution
Material Quantity Final concentration PBS 99 mL Triton™ X-100 1 mL 1 % v/v - Without serum, may be stored at room temperature for 1 year
- Normal serum
- Should be the same species as used to generate the secondary antibody for immunostaining
- Immunofluorescence buffer, stored at 2 – 8°C for up to 6 months
Material Quantity Final concentration PBS 499 mL BSA 500 mg 0.1 % w/v Triton™ X-100 1 mL 0.2 % v/v Tween® 20 0.25 mL 0.05 % v/v - Primary and secondary antibodies diluted in the immunofluorescence buffer at appropriate dilution factor
- 50% methanol solution
- 100% methanol
- ProLong™ Gold Antifade Mountant OR other mountant that roughly matches the refractive index (RI) of proteins (~1.35-1.6)
- Coverslip
Protocol
Antigen Retrieval (Optional)
Antigen retrieval is only meant for samples fixed in PFA or other cross-linking agents. It is an essential step when staining for some antigens (e.g. keratin 8/18) but is optional for other antigens (e.g. acetylated tubulin). Samples fixed in methanol or other organic solvents should not undergo antigen retrieval. Samples fixed in alcohol or other dehydration-type fixatives should not be boiled.
- Aspirate PBS and add 1 mL of citrate buffer to the organoids.
- Set a 1.7 mL-tube heating block to 98°C. Once the heating block reaches 96 – 98°C, place the tube in the heating block and incubate for 20 minutes.
- Turn off the heating block. Allow the organoids to sit in the heating block for an additional 20 minutes while it cools down.Caution the tubes can be hot at this point. If needed, use tweezers to remove the tubes.
- Proceed to permeabilization and blocking steps.
Cell Permeabilization and Blocking
Permeabilization of cells is only needed for intracellular targets. If assessing the surface markers, there is no need for permeabilization. Methanol-fixed samples may not require permeabilization.
- Create the permeabilization / blocking solution by adding 5% normal serum (v/v) to the permeabilization solution.The animal serum used for blocking should be the same as the host of the secondary antibody. For example, if you are planning on using donkey secondary antibodies, donkey serum should be used for this step. Add fresh serum each time; do not store permeabilization / blocking solution long term with serum.
- Aspirate the citrate buffer and add 1 mL of permeabilization / blocking solution to the organoids. Place the tube on its side on a tilting platform and incubate at room temperature with agitation for 1 – 72 hours.The incubation period may need to be optimized for each tissue, antigen, and antibody. Often, however, the incubation period may range from 1 – 72 hours with little to no difference in background signal.If the cells have been fixed in PFA, consider washing the organoids with 0.3 M glycine for 30 minutes before blocking. Glycine will bind to unreacted aldehyde groups to quench PFA autofluorescence and to prevent free aldehydes from reacting with primary or secondary antibodies, thereby causing a high background signal.
Primary Staining
Typical primary antibody dilutions for organoid whole mount are 1:400 – 1:800; titrate as needed per antibody. User optimization for dilutions may be required depending on the antibody. Use as little antibody as possible to mitigate background signal. Antibody incubation periods may need to be optimized for each tissue, antigen, and/or antibody.
- Aspirate the permeabilization / blocking solution and wash 3 times in immunofluorescence buffer. Allow the organoids to sit for 5 minutes between each wash.
- Add 0.5 mL – 1 mL of the primary antibody solution. The solution should include primary antibodies appropriately diluted in the immunofluorescence buffer.Some organoids should be set aside at this point as an isotype control and/or a secondary only control, especially if the antigen is rare or the antibody is new.
- Place the tube on its side on a tilting platform and incubate at room temperature for 16 – 72 hours with gentle agitation.
Secondary Staining
The secondary antibody must be raised against the same isotype as the primary. For example, if using mouse IgM as your primary you will need an anti-mouse IgM for your secondary. Typical antibody dilutions for secondary antibodies are between 1:500 and 1:1000. User optimization may be required depending on the antibody.
To minimize background fluorescence or false signals, it is important that the emission spectra of your conjugated-secondary antibodies do not extensively overlap with one another. Consult the manufacturer’s specifications to determine the excitation and emission spectra of your desired fluors.
- Aspirate the primary antibody solution and wash 3x in immunofluorescence buffer. Allow the organoids to sit for 5 minutes between each wash.
- Add 0.5 mL – 1 mL of the secondary antibody cocktail. The solution should include secondary antibodies appropriately diluted in the immunofluorescence buffer supplemented with 10% normal serum.
- Place the tube on its side on a tilting platform and incubate at room temperature for 16 – 72 hours with gentle agitation. Avoid exposing the organoids to light during this incubation.At any point after the primary or secondary antibody incubations, organoids can be stored in immunofluorescence buffer without antibodies at 2 – 8°C for 2 days or over the weekend (in the dark, without rocking). For best results, continue with the next steps as soon as possible.
Counterstaining
- Add DAPI directly to the secondary antibody solution / organoids to a final concentration of 2 – 4 µg/mL. Place the tube on its side and incubate at room temperature with gentle agitation for 15 – 20 minutes in the dark.Samples can be washed before the addition of DAPI but is not always necessary.If counterstaining with DAPI, use red or far-red secondaries to detect nuclear antigens to prevent DAPI signal spillover into downstream channels (i.e. to avoid a false positive).
- Aspirate the DAPI and secondary antibody solution. Wash the organoids once in water and once in PBS. Allow the organoids to sit for 5 minutes between each wash.At this stage, organoids may be transferred to glass-bottom chamber slides (e.g. 8-well Ibidi® chamber slide) and imaged in PBS without clearing. However, clearing is recommended for best results. Organoids may also be stored for 2 – 3 days in PBS at 2 – 8°C, although image as soon as possible for best results.
Clearing and Mounting
Optical clearing is highly recommended. Not only does the process increase the overall signal-to-noise ratio by reducing light scatter, it also protects fluorophores and dyes from quenching (fading).
In order to reduce light scatter during acquisition, cleared organoids should be imaged in solutions that roughly match the refractive index (RI) of proteins (~1.35-1.6). Prolong™ Gold Antifade Mountant (RI=1.47) is one example of an index-matching solution. Other examples of RI-matching solutions include BABB (2 parts benzyl benzoate with 1 part benzyl alcohol; RI=1.56) and fructose-glycerol (60% glycerol supplemented with 2.5 M fructose; RI=1.469).
Organoids immersed in BABB must be imaged on the same day as clearing. On the other hand, immunolabeled and cleared organoids can be stored in ProLong™ Gold Antifade Mountant at room temperature for as long as 6 months with minimal loss in signal intensity.
- Aspirate the supernatant and resuspend the organoid pellet in 1 mL of 50% methanol in PBS. Place the tube on its side on a tilting platform and incubate at room temperature with gentle agitation for at least 1 hour in the dark.
- Remove the 50% methanol solution and add 1 mL of 100% methanol to the organoids. Place the tube on its side on a tilting platform and incubate at room temperature with gentle agitation for at least 1 hour in the dark.
- Use a 1 mL pipette tip followed by a 200 µL pipette tip to aspirate as much of the methanol solution as possible.
- Resuspend the organoid pellet in 50 µL ProLong™ Gold Antifade Mountant.
- Dispense the organoid/mountant suspension onto the centre of a glass microscope slide.Mountant is quite viscous. Aspirate and dispense slowly to avoid bubbles. For larger organoids, you may need to cut the 200 µL pipette tip before aspirating.
- Place a coverslip on top of the organoid/mountant suspension.The weight of the coverslip on the organoids will compress organoids in the Z plane. If planning on acquiring Z stacks, resuspend in a larger volume of mountant (e.g. 100 µL) and transfer the organoids into a chamber slide or use imaging spacers o confine organoids without compression.
- Allow the mountant to cure for at least 24 hours before imaging.You may want to use clear nail polish to seal the coverslip onto the slide before placing the slide into long-term storage.
Notes
Safety Note
Prior to handling any chemical, consult the Safety Data Sheet (SDS) for proper handling and safety precautions.
References
- STEMCELL.com (Accessed 2024)
Performing Immunocytochemical Staining of Epithelial Organoids.