Category

Stain Target

Immunostaining Cryosections of Neural Organoids

By Antibodies, Cell Types, Fluorescent Staining
Protocol

Immunostaining Cryosections of Neural Organoids

20
steps
12
materials

This protocol is for immunostaining cryosectioned neural organoids to detect specific proteins or characterize cell phenotypes.

Before immunostaining, fix and cryosection neural organoids:

Expected Results

Expected results depend on the targets of interest, as immunostaining must be optimized for antigens, antibodies, cell and tissue type. Best practice is to refer to the Product Information Sheet as a starting point, and to optimize conditions in-house.

Immunofluorescence for CTIP2 (green), PAX6 (magenta), βIII-tubulin/TUJ1 (blue), and DAPI (gray) in day 40 cryosectioned cerebral organoids

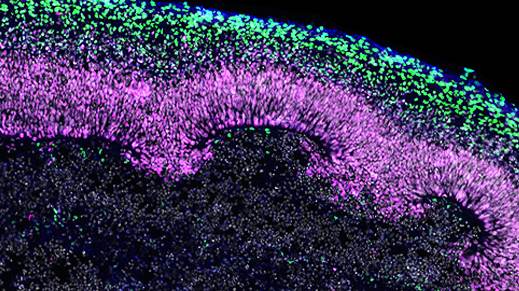
Figure 1. Immunofluorescence for CTIP2, PAX6, βIII-tubulin/TUJ1, and DAPI Showing Stratification of Cortical Plate Neurons and Progenitor Zones in Day 40 Cerebral Organoids

Day 40 cerebral organoids generated using the STEMdiff™ Cerebral Organoid Kit were cryosectioned into a 16-μm-thick section and immunostained for chicken ovalbumin upstream promoter transcription factor-interacting protein 2 (CTIP2; in green), paired box 6 (PAX6; in magenta), βIII-tubulin/TUJ1 (in blue), and DAPI (in gray). Cortical regions are defined by PAX6+ progenitor cells that are radially organized around a pseudo-ventricle. These progenitors give rise to cortical plate neurons indicated by CTIP2 and TUJ1 expression. This image was contributed by STEMCELL Technologies.

Materials

  • Hydrophobic barrier PAP pen
  • Coplin staining jars
  • PBS-T, mixed thoroughly and can be stored at room temperature (15 – 25°C)
    MaterialAmount
    Tween® 201mL
    D-PBS1L
  • Blocking solution, prepared fresh, mixed thoroughly, and used immediately
    • Normal Donkey Serum (NDS) diluted in PBS-T to a final concentration of 5%
  • Primary dilution buffer, mixed thoroughly and can be stored at room temperature (15 – 25°C)
    MaterialAmount
    Sodium azide in 100 mL PBS-T0.05% (final concentration)
    Bovine Serum Albumin (BSA)100mL
  • Primary and secondary antibodies diluted in the immunofluorescence buffer at appropriate dilution factor
  • Coverslip

For Optional Antigen Retrieval

  • Food steamer
  • Heat-resistant plastic Coplin staining jar
  • Tri-sodium citrate (dihydrate)
  • 1 mL citrate buffer, stored at 2 – 8°C for up to 6 months
    MaterialQuantity
    dH2O950mL
    Tri-sodium citrate (dihydrate)2.94g
    HCl / NaOH to adjust pH6.0pH
    Tween® 200.5mL

Tissue Sample

Prepare Slides

  1. Remove sectioned slides from the freezer and allow to dry at room temperature.
  2. Outline sections with a PAP pen. When the pen wax is completely dry, proceed to the next step.
  3. If necessary, perform antigen retrieval. Otherwise, proceed directly to blocking.

Protocol

Antigen Retrieval (Optional)

Antigen retrieval is optional, but highly recommended. Cross-linkages formed by PFA fixation may interfere or block antibody binding to the epitope of interest so detection of certain samples will require an additional antigen retrieval step before incubation with primary antibodies.

  1. Place slides in a heat-resistant plastic Coplin staining jar and fill with citrate buffer.
  2. Place Coplin jar in food steamer and steam for 20 minutes.
  3. Carefully remove hot citrate buffer and wash slides 3X in PBS-T for 10 minutes each.

Blocking

  1. Wash slides with PBS-T at 37°C for 10 minutes to fully remove gelatin from slides.
  2. Lay slides flat and pipette enough blocking solution to completely cover sections. The borders formed by the wax pen will hold blocking solution on the sections of tissue.
  3. Incubate at room temperature in a humidified chamber for 1 hour.

Primary Staining

  1. Prepare primary antibody solution by adding primary antibodies at the appropriate dilution factor to the primary dilution buffer.
  2. Pour blocking solution off of slides and replace with primary antibody solution.
  3. Incubate at room temperature in a humidified chamber overnight (16 hours).

Secondary Staining

  1. Prepare secondary antibody mixes in PBS-T.
  2. Pour primary antibody mix off of slides and place slides in a Coplin staining jar.
  3. Wash slides 3X with PBS-T.
  4. Lay slides flat and pipette secondary antibody mix onto the slides. Incubate at room temperature in a humidified chamber for 2 hours.

Coverslips

  1. Pour off secondary antibody mix and place slides in a Coplin staining jar.
  2. Wash slides 3X with PBS-T for 30 minutes each.
  3. Air-dry slides for 5 minutes.
  4. Add PermaFluor™ to slides and add coverslip. Store at 2 – 8°C and allow to dry before imaging.

Notes

Safety Note

Prior to handling any chemical, consult the Safety Data Sheet (SDS) for proper handling and safety precautions.

Cryogenic Tissue Processing of Neural Organoids

By Antibodies, Cell Types, Fluorescent Staining
Protocol

Cryogenic Tissue Processing of Neural Organoids

16
steps
12
materials

This protocol is for processing mature neural organoids for cryosectioning, with the recommended fixative being paraformaldehyde. Aldehyde-based fixatives (e.g. formaldehyde, glutaraldehyde) are advantageous for preserving secondary and tertiary protein structure, although overfixation can mask epitopes. Dehydration-based fixatives (e.g. methanol, ethanol) may be useful for exposing hidden epitopes, but can also destroy other epitopes. Because sample preparation has a large bearing on the quality of downstream staining in any immunostaining protocol, some antibodies may perform better with dehydration-based tissue fixatives.

After cryosectioning, perform immunofluorescence staining of cryosectioned neural organoids:

View Immunostaining Cryosections of Neural Organoids Protocol >

Materials

  • 50 mL conical tubes
  • Dulbecco’s phosphate-buffered saline without calcium and magnesium (D-PBS)
  • 4% Paraformaldehyde (PFA) solution
  • PBS-T, mixed thoroughly and can be stored at room temperature (15 – 25°C)
    MaterialAmount
    Tween® 20 (Sigma-Aldrich Catalog #P9416-100ML)1mL
    D-PBS1L
  • 30% sucrose solution, mixed thoroughly and can be stored at 2 – 8°C
    MaterialAmount
    Sucrose200g
    D-PBS1L
  • Water bath (37°C)
  • Gelatin solution, prepared fresh, mixed thoroughly, and used immediately
    MaterialAmount
    Sucrose10g
    D-PBS100mL
    Gelatin from Porcine Skin7.5g
  • Dry ice
  • 100% ethanol
  • Embedding mold
  • Cryostat
  • Microscope slides and coverslips

Tissue Sample

Fixation

  1. Cut the end off a 1 mL (p1000) pipette tip. Using the cut pipette tip, transfer cultured neural organoids to a fresh 50 mL conical tube. As many organoids as desired may be transferred to a single tube, as long as they are all completely submerged in all subsequent steps.
    To preserve cytoarchitecture, it is important not to disturb organoids during transfer. Pipette tips can be cut to a larger diameter as needed to accommodate organoid size.
  2. Remove excess medium from the tube. Wash 3X for 10 minutes each with D-PBS. Remove D-PBS.
  3. Add 5 mL fresh 4% PFA per organoid. Incubate overnight (i.e. 16 hours) at 2 – 8°C.
    Detection of cytoarchitecture in neural organoids via immunofluorescence requires proper and thorough fixation of samples. Therefore, using freshly prepared 4% PFA solution from frozen stock aliquots is recommended.
  4. Remove PFA from the conical tube and dispose of it according to appropriate waste handling procedures. Wash organoids 3X for 10 minutes each with PBS-T.
  5. Store samples in PBS-T at 2 – 8°C for up to 1 week.

Protocol

Cryoprotection

  1. Remove PBS-T from organoids and discard. Add 5 mL 30% sucrose solution per organoid.
  2. Allow samples to equilibrate in 30% sucrose solution overnight at 2 – 8°C.
    Time to equilibrate can vary due to organoid size and density. Once organoids no longer float in the 30% sucrose solution, it is appropriate to move to the next step.

Embedding

Gelatin is preferable for neural organoids over other embedding reagents such as optimal cutting temperature compound (OCT), as it provides better rigidity and supports the generation of smooth, clean sections. Gelatin will begin to polymerize and harden at room temperature, so it is necessary to quickly transfer organoids to the embedding mold.

A thin layer of gelatin embedding solution may first be added to the mold and allowed to solidify prior to adding the organoid. This will allow the organoid to be positioned more easily toward the center of the block. Once the organoid has been placed in the mold and the embedding solution has been topped up, use a pipette tip to reposition the organoid if needed.

  1. Warm gelatin solution to 37°C in a water bath.
  2. Pipette sucrose solution out of conical tube and discard. Add enough gelatin solution to completely cover organoids.
    Multiple organoids may be embedded in a single block if desired. On the other hand, older or larger organoids may have necrotic centers, which means they can shear more easily during sectioning. These samples can benefit from being embedded in larger gelatin blocks to provide more external support.
  3. Incubate at 37°C for 1 hour. This allows the gelatin to penetrate and encapsulate the organoid.
    For older or larger organoids, additional incubation time with liquid gelatin at 37°C before embedding can also help by allowing the gelatin to better penetrate the tissue and provide support.
  4. Remove organoids from conical tube and transfer to embedding mold.

Snap Freezing

Rapid freezing helps to prevent the formation of ice crystals in the organoids and to maintain the native cellular architecture of the sample.

  1. Prepare a dry ice/ethanol slurry by adding dry ice to 100% ethanol.
  2. Once the mixture stops boiling, add the embedded sample by holding the embedding mold with forceps and submerging it into the slurry.
  3. Keep the sample in the cold slurry until completely frozen, then transfer to a -80°C freezer for long-term storage.
    If freezing artifacts are still present in samples, snap freezing can also be done via immersion into an isopentane bath chilled with liquid nitrogen. Alternatively, samples may be placed directly into liquid nitrogen in an appropriate vessel such as a dewar flask.

Cryosectioning

  1. Remove blocks from the -80°C freezer and allow them to warm to sectioning temperature in the cryostat for 30 minutes.
    • Optimal sectioning temperature for gelatin-embedded organoids is -26 to -30°C.
    • Typical sectioning thickness is 10 – 20 μm, and can be adjusted based on the imaging to be performed.
    • Collection of multiple serial sections can allow exploration of different markers in different sections.
    • If sections are curling, use a thin brush that has been cooled and kept in the cryostat chamber to gently flatten the section before mounting it on the slide.
    • Always use a new, sharp blade for sectioning.

Safety Note

Prior to handling any chemical, consult the Safety Data Sheet (SDS) for proper handling and safety precautions.

Immunostaining Epithelial Organoids

By Antibodies, Cell Types, Fluorescent Staining

Immunostaining Epithelial Organoids

21
steps
10
materials

This protocol is for immunostaining epithelial organoids — derived from different tissue types including intestinal, mammary, prostate, lung, pancreatic, and liver derived from primary cells or pluripotent stem cells — after fixation:

View Fixing Epithelial Organoids for Immunostaining >

If multiplexing, stain only one Matrigel® dome per antibody panel. If you intend to stain with 4 different panels for example, pool organoids from 4 domes. Depending on the number of the organoids per dome, some optimization may be required. When multiplexing, ensure that the antibody combinations are from different species to avoid cross-reaction during staining.

Expected Results

Expected results depend on the targets of interest, as immunostaining must be optimized for antigens, antibodies, cell and tissue type. Best practice is to refer to the Product Information Sheet as a starting point, and to optimize conditions in-house.

Figure 1. Immunofluorescence for Chromogranin A, E-cadherin, KRT20, and DAPI in Epithelial Organoids

Epithelial organoids grown in IntestiCult™ OGM express chromogranin A (CHGA; for enteroendocrine cells; in green), e-cadherin (ECAD; for renal epithelium cells; in red), KRT20 (for enterocytes; in yellow), and DAPI (for nuclei; in blue). This image was contributed by STEMCELL Technologies.

Materials

  • Dulbecco’s phosphate-buffered saline without calcium and magnesium (D-PBS)
  • Citrate buffer, stored at 2 – 8°C for up to 6 months
    MaterialQuantity
    dH2O1L
    Sodium citrate dihydrate2.94g
    HCl to adjust pH6.0pH
    Tween® 200.5mL
  • 1.7 mL-tube heating block
  • Permeabilization solution
    MaterialQuantityFinal concentration
    PBS99mL
    Triton™ X-1001mL1% v/v
    • Without serum, may be stored at room temperature for 1 year
  • Normal serum
    • Should be the same species as used to generate the secondary antibody for immunostaining
  • Immunofluorescence buffer, stored at 2 – 8°C for up to 6 months
    MaterialQuantityFinal concentration
    PBS499mL
    BSA500mg0.1% w/v
    Triton™ X-1001mL0.2% v/v
    Tween® 200.25mL0.05% v/v
  • Primary and secondary antibodies diluted in the immunofluorescence buffer at appropriate dilution factor
  • 50% methanol solution
  • 100% methanol
  • ProLong™ Gold Antifade Mountant OR other mountant that roughly matches the refractive index (RI) of proteins (~1.35-1.6)
  • Coverslip

Protocol

Antigen Retrieval (Optional)

Antigen retrieval is only meant for samples fixed in PFA or other cross-linking agents. It is an essential step when staining for some antigens (e.g. keratin 8/18) but is optional for other antigens (e.g. acetylated tubulin). Samples fixed in methanol or other organic solvents should not undergo antigen retrieval. Samples fixed in alcohol or other dehydration-type fixatives should not be boiled.

  1. Aspirate PBS and add 1 mL of citrate buffer to the organoids.
  2. Set a 1.7 mL-tube heating block to 98°C. Once the heating block reaches 96 – 98°C, place the tube in the heating block and incubate for 20 minutes.
  3. Turn off the heating block. Allow the organoids to sit in the heating block for an additional 20 minutes while it cools down.
    Caution the tubes can be hot at this point. If needed, use tweezers to remove the tubes.
  4. Proceed to permeabilization and blocking steps.

Cell Permeabilization and Blocking

Permeabilization of cells is only needed for intracellular targets. If assessing the surface markers, there is no need for permeabilization. Methanol-fixed samples may not require permeabilization.

  1. Create the permeabilization / blocking solution by adding 5% normal serum (v/v) to the permeabilization solution.
    The animal serum used for blocking should be the same as the host of the secondary antibody. For example, if you are planning on using donkey secondary antibodies, donkey serum should be used for this step. Add fresh serum each time; do not store permeabilization / blocking solution long term with serum.
  2. Aspirate the citrate buffer and add 1 mL of permeabilization / blocking solution to the organoids. Place the tube on its side on a tilting platform and incubate at room temperature with agitation for 1 – 72 hours.
    The incubation period may need to be optimized for each tissue, antigen, and antibody. Often, however, the incubation period may range from 1 – 72 hours with little to no difference in background signal.
    If the cells have been fixed in PFA, consider washing the organoids with 0.3 M glycine for 30 minutes before blocking. Glycine will bind to unreacted aldehyde groups to quench PFA autofluorescence and to prevent free aldehydes from reacting with primary or secondary antibodies, thereby causing a high background signal.

Primary Staining

Typical primary antibody dilutions for organoid whole mount are 1:400 – 1:800; titrate as needed per antibody. User optimization for dilutions may be required depending on the antibody. Use as little antibody as possible to mitigate background signal. Antibody incubation periods may need to be optimized for each tissue, antigen, and/or antibody.

  1. Aspirate the permeabilization / blocking solution and wash 3 times in immunofluorescence buffer. Allow the organoids to sit for 5 minutes between each wash.
  2. Add 0.5 mL – 1 mL of the primary antibody solution. The solution should include primary antibodies appropriately diluted in the immunofluorescence buffer.
    Some organoids should be set aside at this point as an isotype control and/or a secondary only control, especially if the antigen is rare or the antibody is new.
  3. Place the tube on its side on a tilting platform and incubate at room temperature for 16 – 72 hours with gentle agitation.

Secondary Staining

The secondary antibody must be raised against the same isotype as the primary. For example, if using mouse IgM as your primary you will need an anti-mouse IgM for your secondary. Typical antibody dilutions for secondary antibodies are between 1:500 and 1:1000. User optimization may be required depending on the antibody.

To minimize background fluorescence or false signals, it is important that the emission spectra of your conjugated-secondary antibodies do not extensively overlap with one another. Consult the manufacturer’s specifications to determine the excitation and emission spectra of your desired fluors.

  1. Aspirate the primary antibody solution and wash 3x in immunofluorescence buffer. Allow the organoids to sit for 5 minutes between each wash.
  2. Add 0.5 mL – 1 mL of the secondary antibody cocktail. The solution should include secondary antibodies appropriately diluted in the immunofluorescence buffer supplemented with 10% normal serum.
  3. Place the tube on its side on a tilting platform and incubate at room temperature for 16 – 72 hours with gentle agitation. Avoid exposing the organoids to light during this incubation.
    At any point after the primary or secondary antibody incubations, organoids can be stored in immunofluorescence buffer without antibodies at 2 – 8°C for 2 days or over the weekend (in the dark, without rocking). For best results, continue with the next steps as soon as possible.

Counterstaining

  1. Add DAPI directly to the secondary antibody solution / organoids to a final concentration of 2 – 4 µg/mL. Place the tube on its side and incubate at room temperature with gentle agitation for 15 – 20 minutes in the dark.
    Samples can be washed before the addition of DAPI but is not always necessary.
    If counterstaining with DAPI, use red or far-red secondaries to detect nuclear antigens to prevent DAPI signal spillover into downstream channels (i.e. to avoid a false positive).
  2. Aspirate the DAPI and secondary antibody solution. Wash the organoids once in water and once in PBS. Allow the organoids to sit for 5 minutes between each wash.
    At this stage, organoids may be transferred to glass-bottom chamber slides (e.g. 8-well Ibidi® chamber slide) and imaged in PBS without clearing. However, clearing is recommended for best results. Organoids may also be stored for 2 – 3 days in PBS at 2 – 8°C, although image as soon as possible for best results.

Clearing and Mounting

Optical clearing is highly recommended. Not only does the process increase the overall signal-to-noise ratio by reducing light scatter, it also protects fluorophores and dyes from quenching (fading).

In order to reduce light scatter during acquisition, cleared organoids should be imaged in solutions that roughly match the refractive index (RI) of proteins (~1.35-1.6). Prolong™ Gold Antifade Mountant (RI=1.47) is one example of an index-matching solution. Other examples of RI-matching solutions include BABB (2 parts benzyl benzoate with 1 part benzyl alcohol; RI=1.56) and fructose-glycerol (60% glycerol supplemented with 2.5 M fructose; RI=1.469).

Organoids immersed in BABB must be imaged on the same day as clearing. On the other hand, immunolabeled and cleared organoids can be stored in ProLong™ Gold Antifade Mountant at room temperature for as long as 6 months with minimal loss in signal intensity.

  1. Aspirate the supernatant and resuspend the organoid pellet in 1 mL of 50% methanol in PBS. Place the tube on its side on a tilting platform and incubate at room temperature with gentle agitation for at least 1 hour in the dark.
  2. Remove the 50% methanol solution and add 1 mL of 100% methanol to the organoids. Place the tube on its side on a tilting platform and incubate at room temperature with gentle agitation for at least 1 hour in the dark.
  3. Use a 1 mL pipette tip followed by a 200 µL pipette tip to aspirate as much of the methanol solution as possible.
  4. Resuspend the organoid pellet in 50 µL ProLong™ Gold Antifade Mountant.
  5. Dispense the organoid/mountant suspension onto the centre of a glass microscope slide.
    Mountant is quite viscous. Aspirate and dispense slowly to avoid bubbles. For larger organoids, you may need to cut the 200 µL pipette tip before aspirating.
  6. Place a coverslip on top of the organoid/mountant suspension.
    The weight of the coverslip on the organoids will compress organoids in the Z plane. If planning on acquiring Z stacks, resuspend in a larger volume of mountant (e.g. 100 µL) and transfer the organoids into a chamber slide or use imaging spacers o confine organoids without compression.
  7. Allow the mountant to cure for at least 24 hours before imaging.
    You may want to use clear nail polish to seal the coverslip onto the slide before placing the slide into long-term storage.

Notes

Safety Note

Prior to handling any chemical, consult the Safety Data Sheet (SDS) for proper handling and safety precautions.

Immunostaining Cell Markers in PSC-Derived Kidney Organoids

By Antibodies, Cell Types, Fluorescent Staining
Protocol

Immunostaining Cell Markers in PSC-Derived Kidney Organoids

16
steps
5
materials

This protocol is for fixing and immunostaining pluripotent stem cells (PSC)-derived kidney organoids in one well of a 96-well plate. If using other cultureware, adjust volumes accordingly. For this protocol, the organoids were generated using the STEMdiff™ Kidney Organoid Kit.

Expected Results

Immunofluorescence for podocalyxin (PODXL, magenta), LTL (green), E-cadherin (ECAD, white), CD31 (white), vimentin (VIM, yellow), and MEIS1/2/3 (red) in kidney organoids

Figure 1. Immunofluorescence for Podocalyxin (PODXL), LTL, E-cadherin (ECAD), CD31, Vimentin (VIM), and MEIS1/2/3 in Kidney Organoids

(A) During differentiation, kidney organoids form convoluted tubular structures that resemble the structure and segmentation of the developing nephron. These organoids express markers of the (B) renal epithelium, including podocalyxin (PODXL; in magenta), lotus tetragonolobus lectin (LTL; in green), and e-cadherin (ECAD; in white), (C) endothelium, specifically, platelet endothelial cell adhesion molecule (CD31; in white), and (D) mesenchyme, including vimentin (VIM; in yellow) and Meis homeobox family (MEIS1/2/3; in red). This image was contributed by STEMCELL Technologies.

Materials

  • Dulbecco’s phosphate-buffered saline without calcium and magnesium (D-PBS)
  • Fixation solution: 4% paraformaldehyde (PFA) in D-PBS
  • Permeabilization buffer: PBS-T, prepared fresh
    • Dilute Triton™ X-100 in D-PBS for a final concentration of 0.2%
  • Blocking buffer: 10% donkey serum in PBS-T, prepared fresh
    • Mix thoroughly and store on ice or at 2 – 8°C while in use.
  • Primary and secondary antibody/ies of choice
  • 1 µg/mL DAPI in blocking buffer

Protocol

  1. Aspirate medium from the well containing kidney organoids. Carefully add 200 µL D-PBS to the well. Remove D-PBS.
  2. Fix: Add 85 µL 4% PFA in D-PBS to the well. Incubate at room temperature (15 – 25°C) for 15 minutes. Remove the solution.
  3. Wash the well 3X with 200 µL D-PBS. Remove D-PBS.
    Note: For later immunostaining, keep 200 µL D-PBS in the well, wrap plate with Parafilm®, and store at 2 – 8°C. Remove remaining D-PBS before proceeding to Step 4.
  4. Permeabilize: Add 200 µL PBS-T to the well. Incubate at room temperature (15 – 25°C) for 15 minutes. Remove PBS-T.
  5. Block: Add 200 µL 10% donkey serum in PBS-T to the well. Incubate at room temperature (15 – 25°C) for at least 30 minutes.
  6. Primary antibody staining: While incubating, prepare primary antibody solution by diluting each primary antibody in the blocking buffer. Remove blocking buffer from the well and add 80 µL primary antibody solution.
  7. Incubate at 2 – 8°C overnight with low shaking.
  8. Primary antibody wash: Add 200 µL D-PBS to the well and incubate at room temperature (15 – 25°C) for 5 minutes. Remove D-PBS. Repeat this wash step 5X for a total of 6 washes.
  9. Prepare secondary antibody solution by diluting each secondary antibody in blocking buffer with 1 µg/mL DAPI.
  10. Secondary antibody staining: Add 80 µL secondary antibody solution to the well.
  11. Incubate in the dark at room temperature (15 – 25°C) overnight with low shaking.
  12. Secondary antibody wash: Remove secondary antibody solution. Add 200 µL D-PBS to the well and incubate at room temperature (15 – 25°C) for 5 minutes. Remove D-PBS. Repeat this wash step 5X for a total of 6 washes.
  13. Add 200 µL D-PBS to stained cells; they are now ready for immunofluorescent imaging.
    Note: If not used immediately for imaging, wrap plate with Parafilm® and store in the dark at 2 – 8°C.

Notes

Safety Note

Prior to handling any chemical, consult the Safety Data Sheet (SDS) for proper handling and safety precautions.

Immunostaining Epithelial Cells at the ALI or in Monolayer

By Antibodies, Cell Types, Fluorescent Staining
Protocol

Immunostaining Epithelial Cells

In Monolayers or at the Air-Liquid Interface (ALI)

6
steps
18
materials

This protocol describes the whole-mount immunocytochemical (ICC) staining of air-liquid interface (ALI) cultures (derived from any tissue type) or monolayer cultures (derived from primary cells, pluripotent stem cells, or cell lines) grown in Transwell® inserts. Although ICC can be performed at any point during the ALI culture differentiation phase, the highest degree of differentiated cell staining and visualization will take place after full ALI culture maturity.

The protocol has been used for human bronchial epithelial cells (HBECs) and human small airway epithelial cells (HSAECs) ALI cultures grown with PneumaCult™-ALI Medium or PneumaCult™-ALI-S Medium, which express characteristic cellular markers for the large airway (e.g. tight junctions and ciliated cells) and small airway (e.g. club cells and secretory proteins), respectively. The protocol is also verified for human intestinal cells differentiated in intestinal monolayers and ALI cultures using IntestiCult™ Organoid Differentiation Medium (Human) express higher levels of key differentiation markers (e.g. goblet cells, enterocytes, and enteroendocrine cells).

Expected Results

Immunofluorescence for AC-tubulin (green), ACE2 (magenta), ZO-1 (red), and DAPI (blue) in air-liquid interface cultures of epithelial cells

Figure 1. Immunofluorescence for AC-tubulin, ACE2, ZO-1, and DAPI in <P6 Air-Liquid Interface (ALI) Cultures of Human Bronchial and Small Airway Epithelial Cells (HBECs and HSAECs)

Air-liquid interface (ALI) cultures of human bronchial and small airway epithelial cells — HBECs cultured in PneumaCult™-ALI Medium and HSAECs cultured in PneumaCult™-ALI-S Medium, respectively — expressed markers for respiratory epithelial cells. HBECs at <P6 and HSAECs at <P4 were immunostained for AC-tubulin (for ciliated cells; in green), ACE2 (for SARS-CoV-2 receptor; in magenta), ZO-1 (for tight junctions; in red), and DAPI (for nuclei; in blue). This image was contributed by STEMCELL Technologies.

Immunofluorescence for KRT20 (green) and ZO-1 (red) in day 7 monolayers or MUC2 (green) in day 14 air-liquid interface (ALI) cultures of intestinal cells

Figure 2. Immunofluorescence for KRT20 and ZO-1 in Day 7 Submerged Monolayers and MUC2 in Day 14 Air-Liquid Interface Cultures of Organoid-Derived Intestinal Cells

Organoid-derived monolayers grown as a submerged monolayer (Day 7) or at the ALI (Day 14) using IntestiCult™ Organoid Differentiation Medium (Human) expressed key differentiation markers for intestinal cells. Nuclei were counterstained with DAPI (in blue). (A) Monolayers were immunostained for KRT20 (for enterocytes; in green) and ZO-1 (for tight junctions; red). (B) Cells cultured at the ALI show an increased secretory cell differentiation, as seen by immunostaining for MUC2 (for goblet cells; in green). Scale bar: 250 µm. This image was contributed by STEMCELL Technologies.

Materials

  • Phosphate-buffered saline (PBS)
  • Methanol
  • Parafilm®
  • Kimwipes™
  • Acetone
  • Aspirator
  • Pasteur pipette
  • 100 mL blocking buffer, mixed thoroughly and stored at 2 – 8°C
    MaterialQuantityFinal concentration
    PBS97.85mL
    Normal serum*2mL2%
    BSA1g1%
    Cold fish skin gelatin100mg0.1%
    Triton™ X-100100μL0.1%
    TWEEN® 2050μL0.05%
    Sodium azide**50mg0.05%

    *The Normal serum must be of the same species as used to generate the secondary antibody.
    ** Sodium azide is an antibacterial agent added to prevent bacterial growth in the buffer when stored for longer periods. It is very toxic and is dispensable as long as the buffer is used quickly (within a few days).

  • Primary and secondary antibody/ies of choice
  • 100 mL primary antibody dilution buffer, mixed thoroughly and stored at 2 – 8°C
    MaterialQuantityFinal concentration
    PBS100mL
    BSA1g1%
    Cold fish skin gelatin100mg0.1%
    Sodium azide50mg0.05%
  • 100 mL of secondary antibody dilution buffer, mixed thoroughly and stored at 2 – 8°C
    MaterialQuantity
    PBS100mL
    Sodium azide50mg
  • 1 mL of DAPI staining stock solution, aliquoted into volumes of 50 μL
    MaterialQuantity
    PBS1mL
    DAPI5mg
    • The DAPI staining stock solution will have a final concentration of 5 mg/mL.
    • Store the DAPI staining stock solution at -20°C, then thaw separate aliquots for future use.
  • Liquid mountant (e.g. Prolong™ Gold Antifade Mountant)
  • Confocal or fluorescence microscope
  • Microscope slides (e.g. SuperFrost™ Plus Microscope Slides)
  • Coverslips

Tissue Sample

Plate Preparation

  1. Retrieve the ALI cultures growing in Transwell® inserts in a cell culture plate from the incubator.
  2. In a biosafety cabinet, remove the culture medium from the plate wells, and wash the ALI cultures 5X with room temperature PBS for 5 minutes each. Carefully aspirate PBS, making sure not to touch the culture.
    Note: If your ALI cultures are undergoing electrophysiology analysis in an Ussing chamber, retrieve them, remove any excess buffer from the Transwell® inserts, and proceed to the next step.
  3. Place the plate containing Transwell® inserts in ice-cold (-20°C) methanol and seal the plate with Parafilm®. Incubate the plate overnight at -20°C.
  4. Remove the methanol from the ALI cultures by quickly inverting each Transwell® insert, and dabbing on a Kimwipe™.
  5. Dip the bottom portion of the inserts, containing the polyester membrane, into -20°C cold acetone for 1 minute. After 1 minute, dab on a Kimwipe™ to remove any excess acetone, and set upside down to air-dry. Once dry, store the plate containing Transwell® inserts at 2 – 8°C until needed, or proceed to the next step (blocking).

Protocol

Blocking

  1. Gently wipe the bottom of each Transwell® insert with a PBS-soaked Kimwipe™.
  2. Wash each insert 3X with PBS for 5 minutes each, adding 200 μL PBS to the apical compartment and 500 μL PBS to the basal compartment. After each wash, use an aspirator to carefully remove the PBS.
  3. Incubate the inserts with the blocking buffer at room temperature for 1 hour. Rocking the plates is not necessary, but beneficial when possible.

Primary Antibody Addition

  1. Wash each insert 3X with PBS for 5 minutes each.
  2. Add primary antibodies of your choice to the primary antibody buffer at the desired dilution. Add 200 μL of this diluted mixture to the apical compartment and 500 μL to the basal compartment.
  3. Incubate overnight at 2 – 8°C. Rocking the plates is not necessary, but beneficial when possible.

Secondary Antibody Addition

  1. Remove the primary antibody buffer from each insert by aspiration, and then wash them again 3X with PBS, for 5 minutes each.
  2. Add relevant secondary antibodies into the secondary antibody buffer at a dilution of 1:1000. Add 200 μL of this diluted mixture to the apical compartment and 500 μL to the basal compartment.
  3. Incubate the inserts at room temperature for 2 hours in the dark. After adding the conjugated secondary antibody, avoid exposing the plate to light to prevent any fluorescence quenching.

Mounting and Visualization

  1. Wash the inserts 3X with PBS, for 5 minutes each.
  2. Add DAPI staining stock solution into PBS at a dilution of 1:1000. Add 200 μL of this diluted mixture to the apical compartment and 500 μL to the basal compartment.
  3. Incubate at 2 – 8°C for 10 – 15 minutes.
  4. Wash each insert once with PBS for 5 minutes.
  5. Aspirate the PBS from the individual inserts, then peel or cut the polyester membrane from the Transwell® hanger (Figure 1). Once separated from the hanger, use surgical scissors to cut away the curved membrane edge. This will allow the stained culture membrane to sit flat under the coverslip during the mounting procedure.
  6. Using a plastic Pasteur pipette, add one droplet of liquid mountant to a microscope slide for every stained culture membrane to be mounted.
    Do not exceed three culture membranes to be mounted on a single slide.
    To prevent air bubbles being caught under the coverslip from step 24, add a small volume of liquid mountant in a line to connect the existing droplets of the solution.
  7. Using forceps, place one stained culture membrane, cell-side up, on a droplet of liquid mountant. Add extra liquid mountant on top of the membrane, so as to completely cover the membrane’s surface. Carefully place a coverslip on top of the membranes covered in liquid mountant.
  8. Allow the slides to cure at room temperature overnight in the dark, sitting horizontally flat.
  9. On the following day, visualize and take images of the stained membranes using a confocal microscope at 63X oil immersion.

Notes

Safety Note

Prior to handling any chemical, consult the Safety Data Sheet (SDS) for proper handling and safety precautions.

Fixing Epithelial Organoids for Immunostaining

By Antibodies, Cell Types, Fluorescent Staining
Protocol

Fixing Epithelial Organoids for Immunostaining

14
steps
9
materials

This protocol and volumes are optimized for whole-mount fixation of epithelial organoids (50 – 500 µm) cultured in Corning® Matrigel® (Growth Factor Reduced, Phenol Red Free, Corning Catalog #356231) domes. The epithelial organoids can be derived from different tissue types, including intestinal, mammary, prostate, lung, pancreatic, and liver derived from primary cells or pluripotent stem cells.

After fixation, perform whole-mount immunostaining of epithelial organoids:

View Immunostaining Epithelial Organoids Protocol >

Materials

  • Anti-adherence rinsing solution
  • Gentle Cell Dissociation Reagent (GCDR) OR Cold Cultrex® Organoid Harvesting Solution OR cold Corning® Cell Recovery Solution (Corning Catalog #354253)
  • Axygen® 200µL Pipet Tips, Wide-Bore (Corning®, T-205-WB-C-R-S)
  • 40mL fixation solution: 4% paraformaldehyde (PFA) in Phosphate-buffered saline (PBS)
    • 4% PFA Solution may be aliquoted and stored at -20°C for 6 months. Avoid multiple freeze-thaws and exposure to light.
  • Immunofluorescence buffer, stored at 2 – 8°C for up to 6 months
    MaterialQuantityFinal concentration
    PBS499mL
    BSA500mg0.1% w/v
    Triton™ X-1001mL0.2% v/v
    TWEEN® 200.25mL0.05% v/v
  • Dulbecco’s phosphate-buffered saline without calcium and magnesium (D-PBS)

Tissue Sample

Recovery of Whole Organoids from Matrigel®

For organoid suspensions (i.e. grown in the absence of Matrigel® or with non-gelling Matrigel® concentrations), they do not need to be recovered, so this section can be skipped.

This recovery is optimized for organoids between 50 and 500 µm in diameter, with at least 100 organoids per panel. Some optimization may be necessary. If the organoids are less than 50 µm in diameter, start with a larger number of organoids. lf the organoids are 1 mm or larger in diameter, this protocol is not appropriate.

  1. Pre-rinse a 15 mL conical tube with anti-adherence rinsing solution. Tilt or vortex the tube to ensure the tube wall is coated with rinsing solution.
    Pre-rinsing prevents organoid adhesion to cultureware and markedly increases organoid recovery.
  2. Remove the culture medium from the well and add 1 mL of cold Gentle Cell Dissociation Reagent (GCDR) to the well.
    Cold Cultrex® Organoid Harvesting Solution or cold Corning® Cell Recovery Solution (Corning Catalog #354253) can be used in place of GCDR.
  3. Cut a 1 mL pipette tip (or use a wide-bore pipette tip), and pre-rinse it with anti-adherence rinsing solution. Use the same tip to (gently) triturate the dome twice, then transfer the organoids to the tube prepared in step 1.
    Breaking up the dome into smaller fragments allows for more efficient digestion of Matrigel®. Liberation of organoids from Matrigel® is important to prevent Matrigel® from interfering with downstream staining. Avoid excessive or harsh trituration, which may shear or damage the organoids.
  4. Place the tube on its side on ice. Place the ice box on a rotating or tilting platform and agitate Matrigel®-organoid suspension for 20 minutes.
  5. Cut and pre-rinse a 1 mL pipette tip (or use a wide-bore pipette tip) with anti-adherence rinsing solution and use the same tip to gently triturate the Matrigel® fragments.
  6. Place the tube back on ice and incubate for an additional 20 minutes with agitation.
    The incubation is complete when Matrigel® is dissolved and organoids start to float in suspension; this may require an incubation longer than 1 hour.
  7. Allow the organoids to settle by gravity.
  8. Aspirate the supernatant, which should contain most of the Matrigel®. Proceed to organoid fixation.

Protocol

There are two principal methods of chemical fixation: dehydration and cross-linking. Learn more:

View Fixation Resource >

The optimal fixation method should be determined experimentally for each tissue and for each antibody-antigen interaction. Generally, PFA fixation followed by antigen retrieval leads to the best results.

  1. Pre-rinse a 1.7 mL microcentrifuge tube with anti-adherence rinsing solution.
  2. Remove the supernatant from the organoid pellet and resuspend the organoids in 1 mL of 4% PFA.
  3. Pre-rinse a 1 mL pipette tip in anti-adherence rinsing solution and use the same tip to gently transfer the organoids from the 15 mL conical tube to the microcentrifuge tube prepared in step 1.
  4. Place the tube on its side and incubate in PFA with gentle rocking for 45 minutes.
    Although the optimal time for fixation will vary between tissues depending on their size and density (and the type of fixative), a fixation time of 45 – 60 minutes will ensure the complete fixation of organoids of most shapes and sizes (i.e. organoids up to 500 µm in diameter).
  5. After the incubation period, wash the organoids once in immunofluorescence buffer to eliminate residual PFA. Let the organoids settle after the wash.
    Performing one wash is generally sufficient. If needed, a second wash may be performed. Allow organoids to settle by gravity after all washes.
  6. Resuspend the organoids in 1 mL of D-PBS and proceed to antigen retrieval / immmunostaining.
    Organoids may be stored long term at 2 – 8°C in PBS. However, it is ideal to proceed to the next step as soon as possible to minimize loss of the antigen signal.

Notes

Safety Note

Prior to handling any chemical, consult the Safety Data Sheet (SDS) for proper handling and safety precautions.

Periodic Acid Schiff Diastase

By Aldehydes, Periodic Acid-Schiff Reaction, Protocols, Schiff's Reagent Reactions, Stain Target, Stain Type
Protocol

Periodic Acid Schiff Diastase

15
steps
4
materials

The periodic acid Schiff reaction (PAS) is used to demonstrate the presence of 1-2-glycols, including glycogen. Sometimes it is necessary for the glycogen to be removed so that a clearer picture of non-glycogen carbohydrates may be seen. Glycogen may be removed with amylase (diastase).

Materials

Tissue Sample

5µ paraffin sections of neutral buffered formalin fixed tissue are suitable. Other fixatives are usually satisfactory, although glutaraldehyde should be avoided.

Protocol

  1. Two consecutive test and 2 consecutive control sections.
  2. Bring sections to water via xylene and ethanol.
  3. Place one test section and one known positive section into water.
  4. Place the other test section and the other known positive in the amylase solution for 30-60 minutes at 35-45°C
  5. Wash both digested sections with tap water
  6. Celloidinise the sections if desired.
  7. Place into periodic acid for 10-30 minutes.
  8. Rinse well with tap water.
  9. Rinse with distilled water.
  10. Place in Schiff’s reagent for 10-30 minutes.
  11. Wash off with distilled water.
  12. Wash well with tap water for about 10 minutes.
  13. Counterstain with Mayer’s hemalum for 2 minutes.
  14. Wash well with tap water until hemalum is blued.
  15. Dehydrate with ethanol, clear with xylene and coverslip using a resinous medium.

Expected Results

  • Glycogen – red in the undigested section, absent from the digested section.
  • Oxidisable carbohydrates – red
  • Nuclei – blue

Notes

  • If the intent is to remove glycogen rather than identify it, a more convenient approach in a routine service laboratory is to dissolve the amount of α-amylase that would cover a 1 cm circle about 1 mm deep in 15 mL (1 test tube) of distilled water. Shake for a few minutes, then filter onto the sections and digest at room temperature. Glycogen is usually removed within 30 minutes to 1 hour. Wash well and continue with a regular PAS (step 7).
  • Please note that an older variation of the procedure in Note 1 was to collect saliva and use that for the digestion. This is strongly deprecated. Human body fluids may contain transmissible bacterial and viral contaminants, so anyone handling such a slide will be at risk.
  • Hog α-amylase is recommended as being consistent and effective. Purchase a product with a high α-amylase activity.
  • Glutaraldehyde fixation leaves free aldehyde groups attached to tissues, which causes an overall positive reaction. These groups may be stopped from reacting with an appropriate procedure such as the aniline-acetic aldehyde block.
  • The tap water wash at step 7 is necessary to develop the red color. Within limits, the longer the wash the darker the color.
  • Originally, it was recommended that the Schiff’s reagent be washed off with dilute sulfurous acid (the sulfite rinses). Since water recolors Schiff’s reagent, it was believed that a water wash could lead to false positive results. It is now known this is not the case, provided the Schiff’s reagent is removed quickly and the sections do not stay in water contaminated with it for extended periods.

Safety Note

Prior to handling any chemical, consult the Safety Data Sheet (SDS) for proper handling and safety precautions.

Maximow’s Metachromatic Stain

By Intracytoplasmic Granules, Mast Cells, Protocols, Stain Target
Protocol

Maximow's Metachromatic Stain

6
steps
2
materials

Materials

  • Ethanol, 50%, saturated with thionin.
  • Sodium carbonate, 0.3% w/v aqueous.

Tissue Sample

Alcohol fixed tissues are recommended, but5µ paraffin sections of neutral buffered formalin fixed tissue may be suitable. Other fixatives may be satisfactory.

Protocol

  1. Dewax with xylene and bring sections to 70% ethanol.
  2. Stain with the thionin solution for 24 to 48 hours.
  3. Blot section dry.
  4. Rinse twice with 95% ethanol.
  5. Rinse well with absolute ethanol.
  6. Clear with xylene and mount with a resinous medium.

Expected Results

  • Nuclei – blue
  • Mast cell granules – red/purple

Safety Note

Prior to handling any chemical, consult the Safety Data Sheet (SDS) for proper handling and safety precautions.

References

  1. McManus, J.F.A. and Mowry, R.W., (1960),
    Staining methods, histologic and histochemical, pp. 261.
    Harper & Row, New York, NY, USA.

Eosin for Eosinophils

By Eosinophils, Intracytoplasmic Granules, Protocols, Stain Target
Protocol

Eosin

for Eosinophils

6
steps
2
materials

Materials

Tissue Sample

5µ paraffin sections of neutral buffered formalin fixed tissue are suitable. Other fixatives are likely to be satisfactory.

Protocol

  1. Bring sections to water via xylene and ethanol.
  2. Stain nuclei lightly with alum hematoxylin.
  3. Differentiate if necessary and blue.
  4. Place in eosin solution for 5 minutes.
  5. Wash well with tap water until sections are almost unstained.
  6. Dehydrate with ethanol, clear with xylene and mount with a resinous medium.

Expected Results

  • Nuclei – blue
  • Eosinophils – bright pink
  • Background – pale pink to colorless

Notes

  • The tap water should be hard and very slightly alkaline.
  • Areas which have acidic or soft tap water should use Scott’s tap water substitute. If this is too alkaline, it may be diluted.
  • The water wash is to remove eosin from connective tissues so that the eosinophil granules are the most prominent feature. A light pink background helps with orientation.
  • Adjust staining and washing times to obtain suitable results.

Safety Note

Prior to handling any chemical, consult the Safety Data Sheet (SDS) for proper handling and safety precautions.

Masson Fontana Silver Reduction

By Intracytoplasmic Granules, Melanin & Enterochromaffin, Protocols, Stain Target
Protocol

Masson Fontana

Silver Reduction

13
steps
7
materials

Materials

  • Silver nitrate, 10% aqu.
  • Strong ammonium hydroxide (s.g. 0.880)
  • Sodium thiosulphate, 3% aqu.
  • Gold chloride, 0.1% aqu.
  • Neutral red, 1% aqu.
  • Mallory bleach
    MaterialAmount
    Potassium permanganate, 1% aqu.47.5mL
    Sulfuric acid, 3% aqueous2.5mL

Preparation of Ammoniacal Silver

  1. Place 20 mL of the 10% silver nitrate in a flask and add drops of strong ammonium hydroxide while swirling the solution.A precipitate will form at first, but will redissolve as more ammonia is added.
  2. Stop when it is almost redissolved and is faintly opalescent, then add 20 mL of distilled water.

Tissue Sample

5µ paraffin sections of neutral buffered formalin fixed tissue are suitable. Other fixatives are likely to be satisfactory. A section adhesive is recommended.

Protocol

  1. Bring sections to water via xylene and ethanol.
  2. Optionally, remove melanin with the Mallory bleach.
  3. Bleach in Oxalic acid for a few minutes.
  4. Rinse with distilled water.
  5. Treat with ammoniacal silver, either:
    1. overnight at room temperature, or
    2. 45-60 minutes at 37°C, or
    3. 30 minutes at 56°C
  6. Rinse well with distilled water.
  7. Optionally, tone with 0.1% gold chloride for 10 seconds.
  8. Rinse well with distilled water.
  9. Fix in sodium thiosulfate for 5 minutes.
  10. Wash well with running tap water.
  11. Counterstain with neutral red for 1 minute.
  12. Rinse with tap water.
  13. Dehydrate with ethanol, clear with xylene and mount with a resinous medium.

Expected Results

  • Melanin (unbleached) – black
  • Melanin (bleached) – unstained
  • Enterochromaffin – black
  • Lipofuscin – black
  • Nuclei – red
  • Background – grey

Safety Note

Prior to handling any chemical, consult the Safety Data Sheet (SDS) for proper handling and safety precautions.

References

  1. Bancroft, J. D. and Stevens, A. (1977).
    Theory and practice of histological techniques.
    Churchill Livingstone, Edinburgh, UK.
  2. Gray, Peter. (1954)
    The Microtomist’s Formulary and Guide. p. 596
    Originally published by: The Blakiston Co.
    Republished by: Robert E. Krieger Publishing Co.